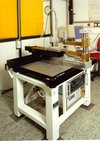
Target Scanner
Automatic device for measuring the thickness or surface profile of bulk samples
The set up consists of various components:
- The measuring unit is fixed to an optical table from Newport (VH-3036-OPT-08, 750 mm x 900 mm). After a disturbance the table top is stabilized again within short time (< 1 s) by means of compressed air.
- On this table top an xy stage is mounted, which consists of two slides (NCB 76-K2-Ni-LS-Q) from Schneeberger with 1000 mm and 600 mm travel respectively. The angular error is smaller than 10 angular seconds over the whole travel. The fundamental tolerance of the error along the slide is smaller than 12 µm over 100 mm travel. This tolerance is reproducible, that means it is not relevant in case of a differential measurement.
The sample is mounted on the front of the upper slide. The sample to be measured can be positioned in x and y direction independently relatively to the measuring gauges which are fixed on the optical table. For a more precise positioning on each slide an external glass scale is installed. For measuring the thickness two incremental measuring gauges are fixed vertically in a U-shaped holder. The glass scales as well as the measuring gauges are from Heidenhain.The glass scales (Type LS 506) have an accuracy of ± 3 µm and the smallest recommended step width is 0.5 µm. The incremental length gauges have a maximum travel of 60 mm each and an accuracy of ± 0.1 µm. With the display unit ND 231 the signals of each gauge signal separately or the difference of both signals (= thickness) can be displayed. - The controlling of the xy stage is done with the stage control SM320 of SM Elektronik with two servomotors. The control can be operated directly with keys on the front panel or alternatively via a RS 232-interface with a PC. The main control, that means parameter input, implementation of the SM320, operation of the measuring gauges, data acquisition, data evaluation, and data storage was developed from the department DVEE of GSI, namely Dr. Holger Brand and Dr. Klaus Poppensieker, on the basis of LabView. The data storage is done in an ORACLE-data base. The project was called Target Scanner.
If you have any further questions or remarks, please send an e-mail to B.Kindler.


