


IT Manual: Remote Access to Linux Machines (SSH, X2Go)
Introduction
To access Linux machines from a remote location you can either use the shell (SSH) or work graphically (X2Go). This way you can access your personal or one of GSIs pool machines.
- Connect via Secure Shell (SSH)
- Remote access from Windows (PuTTY)
- Key-based Authentication
- Connections over multiple hosts (ProxyJump, Tunneling, sshuttle)
- Copy files and mount Directories over SSH (scp, sshfs)
- Working graphically on own or pool machine (X11, X2Go)
- Restart connections automatically
- Security
- Getting help from the IT department
- Support
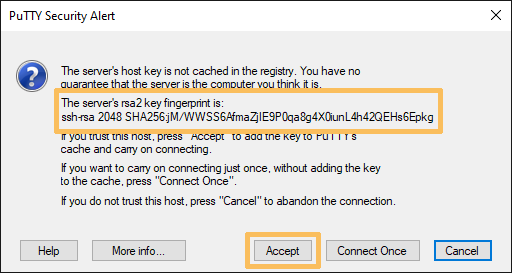
The Secure Shell (SSH) can be used to establish remote connections using the command-line. Simply connect to one of the interactive Linux machines using its name, e.g. ssh account@lx-pool.gsi.de. Replace account with your Linux account name. First time around the system will ask you to accept the remote computer into the list of known hosts. For pool machines you should compare the fingerprint presented to you with the the one published by GSI (see pool machines). If it matches you can accept it as a trustworthy computer from GSI by typing yes followed by pressing enter (return, here represented by the "↵" symbol). To close your SSH session use the command exit.
» ssh account@lx-pool.gsi.de↵
The authenticity of host 'lx-pool.gsi.de (140.181.70.153)' can't be established.
RSA key fingerprint is b7:77:89:3d:96:d8:05:a3:6d:4b:17:5e:ed:81:1a:3e.
Are you sure you want to continue connecting (yes/no)? yes↵
Warning: Permanently added 'lx-pool.gsi.de' (RSA) to the list of known hosts.
account@lx-pool.gsi.de's password:
To save your SSH configuration you can use the file $HOME/.ssh/config. It is made up of blocks. The first line states, to which targets the block should apply, e.g. with Host, which expects a list of hostnames. The names may contain stars to match multiple hosts. Below are lines with SSH options and their values. If your Linux account name differs from your local account name, you can omit the account@ in account@lx-pool.gsi.de with the User option. With HostName you can even shorten the hostname of the target. In the following example the command ssh lxpool would be sufficient to login to the pool.
# Default account for GSI/FAIR
Host lxpool
  HostName lx-pool.gsi.de
Host *.gsi.de
  User account
Since connecting to a pool is potentially using a different machine for every login, another good Option to set is CheckHostIP no. Otherwise ssh will complain everytime it sees another IP address. Set this option for every pool you use.
The instructions for Windows are basically the same as for Linux machines. The main difference is the program to use. Instead of calling ssh directly you have to use a program like PuTTY. In the screenshot you can see how to create a connection to lx-pool.gsi.de with it.
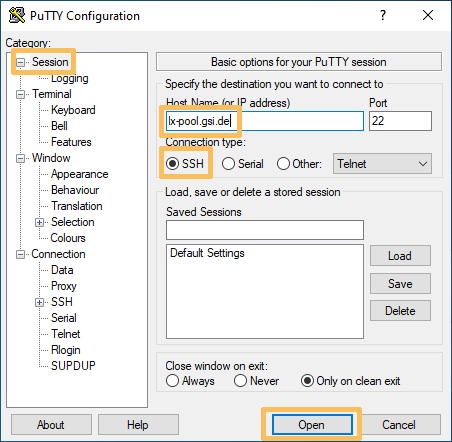
If you are connecting to a SSH server for the first time you will have to accept its SSH key. Please see the instructions above on how to verify the key.
Using SSH keys instead of passwords in combination with ssh-agent (see below) can make working with SSH very easy and secure. If you want to use the GSI/FAIR compute cluster it is even required to use keys.
Generate an SSH public/private key pair on your local computer with the ssh-keygen utility by using the command example below. The public key ($HOME/.ssh/id_ed25519.pub) will reside on the servers you want to connect to, while the private key ($HOME/.ssh/id_ed25519) needs to remain on your local machine. It is very important that the private key is never disclosed to anyone. Think of automatic backups, lost laptops, old hard drives and so on. The only way to keep this under control is to choose a strong password for your private key.
As most GSI Linux machines mount your central home directory, you just have to upload your public key to one host. After you installed your key, ssh will automatically ask for your key password and use it instead of a normal password based login.
# Create a new key pair
» ssh-keygen -o -q -f ~/.ssh/id_ed25519 -t ed25519

# Change the password of an existing private key
» ssh-keygen -o -f ~/.ssh/id_ed25519 -p

# Install your public key on a pool
» ssh-copy-id account@lx-pool.gsi.de

# Alternatively copy the key by hand and correct access permissions
» cat ~/.ssh/id_ed25519.pub | ssh account@lx-pool.gsi.de 'cat >>~/.ssh/authorized_keys'
» ssh account@lx-pool.gsi.de 'chmod 700 ~/.ssh; chmod 600 ~/.ssh/authorized_keys'
You can use ssh-agent in order not to type your key password every time you open a connection. It is a small daemon (background process), that caches your unencrypted private key securely in memory. Usually ssh-agent is started at login time (for GUI sessions eg. KDE logins). You can mange your agent with the command ssh-add.
# Check if an agent is running
» ssh-add -l
The agent has no identities.
# i.e. ssh-agent is running, but no keys are loaded

# Add a private key to your agent
» ssh-add ~/.ssh/id_ed25519
Enter passphrase for /home/account/.ssh/id_ed25519:
Identity added: /home/account/.ssh/id_ed25519 (/home/account/.ssh/id_ed25519)

# List all added keys
» ssh-add -l
2048 2b:c5:77:23:c1:34:ab:23:79:e6:34:71:7a:65:70:ce .ssh/id_ed25519 (RSA)
It is often necessary to login to one machine to be able to connect to another that is otherwise unreachable. E.g. when working over the internet you have to use some intermediary machine to connect to lustre.hpc.gsi.de. Since lx-pool.gsi.de is reachable from the internet, you can tunnel through these nodes to access internal resources.
The simplest solution for this is the option ProxyJump (-J, e.g. ssh -J account@lx-pool.gsi.de account@virgo-debian8.hpc.gsi.de). This is a relativly new SSH option and therefore not available on Debian Jessie or CentOS 7 (see below for alternatives). Here is an example how to use ProxyJump in a configuration file. With these settings logins are possible simply by typing ssh virgo-debian8.
Host lxpool               # An arbitrary name, choose what suits you
  HostName lx-pool.gsi.de # The real name of lxpool
  User $USER_AT_GSI       # Your Linux account at GSI/FAIR
  ForwardAgent no
Host virgo-debian8        # Another arbitrary name
  Hostname virgo-debian8.hpc.gsi.de
  User $USER_AT_GSI
  ProxyJump lxpool        # The arbitrary name chosen in the previous block
Connections to several network ports can be forwarded through an SSH tunnel with the option -L: ssh -L local-port:remote-server:remote-port ssh-server. E.g. to tunnel port 80 from a webserver to your local port 8080, you would use the command ssh -N -L 8080:some-webserver.gsi.de:80 lx-pool.gsi.de.
You can use this to forward your SSH connection, by opening a tunnel (-L 22222:remote-server:22) and then using it (ssh localhost:22222).
Another alternative is sshuttle. It implements transparent VPN access via SSH. With it you can comfortably access GSI resources from a remote location.
# Tunnel all requests (even DNS requests) through GSI
# The command will first ask for your sudo and then for your SSH login password
» sshuttle --dns --remote account@lxpool.gsi.de --daemon --pidfile=/tmp/sshuttle.pid 0/0

# Only forward requests to specified IP ranges (and no DNS requests)
» sshuttle --remote account@lxpool.gsi.de --daemon --pidfile=/tmp/sshuttle.pid 140.181.64.0/18

# Disconnect the tunnel
» kill $(cat /tmp/sshuttle.pid)
scp (secure copy) is used to copy files across ssh connections. To copy a local directory completely (-r: recursive) into a directory in your home directory use the command scp -r /local/path/ account@lx-pool.gsi.de:remote/path/. If you want to copy from a remote host to your local machine just switch the two arguments (source and destination). In case you plan to transfer a signification amount of data you may increase the speed by using an alternative encryption method like Blowfish with -c blowfish.
Using sshfs it is possible to mount a remote directory on a local one. Then you can use your local tools, e.g. your text editor, to work on remote files.
# Mount path in your home directory under your local /mnt/path
» sshfs account@lx-pool.gsi.de:path /mnt/path -C -o reconnect,auto_cache,follow_symlinks

# Close the mount
» fusermount -u /mnt/path
To access internal ressources like Lustre, sshfs may needs to be tunneled through other nodes, like lx-pool.gsi.de. For this you have the options mentioned further above:
- Create a VPN with
sshuttleto lustre.hpc.gsi.de and executesshfsthrough it. - Set
ProxyJumpin you configuration file or use it as an option:sshfs -o ProxyJump=lx-pool.gsi.de lustre.hpc.gsi.de:/lustre /mnt/lustre. - Establish port forwarding with
ssh -f -N -L 22222:lustre.hpc.gsi.de:22and passsshfsthe local port with the option-p 22222.
To enable support for tunneling graphical applications (X11) via SSH use the -X option. In a configuration file you could enable this permanently with ForwardX11 yes. However X11 forwarding is slow and insecure. This is why we advertise the use of X2Go.
X2Go allows graphical remote connections to our pool lx-pool.gsi.de and every managed personal Linux machine. It is comparable to Windows Terminal Server. Compared to other solutions like VPN and X-Win32 X2Go has the following advantages:
- no server side configuration or interaction required
- better performance especially via WAN connections
- dynamic resizing of the imported desktop
- no license issues
- automatic tunneling via ssh (TCP port 22)
The server part of X2Go is installed on all Linux systems and the client on every Linux desktop system. On Windows it can be installed with the x2goclient package from the Software Center.
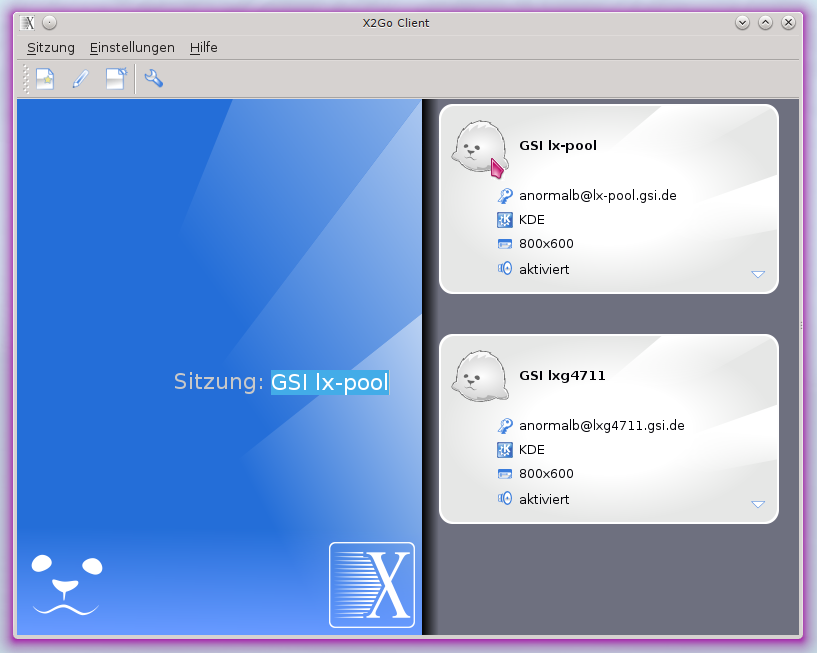
Create and start a connection
To start the client on Linux hosts you may enter the command x2goclient or use the corresponding menu entry:
- KDE4: K → Applications → Internet → X2Go Client
- XFCE: x → Internet → X2Go Client
Before starting a connection you have to create one first:
- In the tab "Sitzung" (session) you may enter a reasonable session name in the field "Sitzungsname".
- Enter the host name of the remote system and your remote user name in the fields "Host" and "User" and keep the port number of 22.
- If you are using a key pair for ssh connections you may check the corresponding box "Anmeldung …". For login with your Linux password please leave the box unchecked.
- At last you may choose your session type in the pull-down menu "Sitzungsart". KDE is the default setting, if you prefer XFCE, then choose the corresponding menu entry.
- Finally save your connection settings by clicking the OK button.

Click on one of your available connections. If you are using it for the first time, you may have to accept the ssh key of the remote host (see e.g. Pool machines). Depending on your authentication method you may be prompted for your password or the secret for you private ssh key. The server will start the graphical session and a new window will appear granting you access to the remote desktop.
Close a connection
To end a remote session you have to log out from the remote desktop, e.g.:
- KDE4: K → Leave → Log out
- XFCE: x → Log Out
Closing the X2Go window without logging out keeps the session running, so you may reconnect to this session later. This is only useful when connecting to a dedicated machine. If you're using a pool the next connection may take you to another machine. To pick a single machine from a pool you may run the command host lx-pool.gsi.de to get a list of available hosts.
When the host you are connected to has errors, e.g. due to faulty hardware, or it has to be rebooted for other reasons, your connection will be closed. There are ways to automate the process of connecting again.
For SSH connections you can use autossh. It reconnects automatically when it discovers a lost connection. Normally it uses a different port then SSH (port 22) to send heartbeats for that. These messages can (and must be) send over the SSH connection when the port is set to zero (-M 0).
autossh -M 0 $USER@lxlogin.gsi.de
# or export the port for all following commands
export AUTOSSH_PORT=0
autossh $USER@lxlogin.gsi.de
# or make the setting persistent in .bashrc
export AUTOSSH_PORT=0 >>~/.bashrc
. ~/.bashrc
autossh $USER@lxlogin.gsi.de
When autossh connects again, you will get a new SSH session. So any running commands will likely be closed. To avoid this, please use a terminal multiplexer like screen or tmux on the target machine.
autossh can also be used to automate sshuttle. Unfortunately sshuttle does not provide a fitting status code when a connection is lost. This can however be corrected with a little script.
# create the script (only one time)
cat <<CODE >~/sshuttle-in-autossh
#!/bin/sh
sshuttle "$@"
[ $? -eq 99 ] && kill -s USR1 $$
CODE
# run autossh with the script
AUTOSSH_PATH=~/sshuttle-in-autossh autossh -M 0 -- -r $USER@lxlogin.gsi.de 140.181.0.0/32
A fully functional SSH account is a very valuable resource for malicious activities. It is therefore very important to pay attention to security. Unfortunately, most of the security settings cannot be technically enforced, or come at a great cost to usability. General advice is:
- Use a strong password for your account.
- Use a strong password for your private key.
- Never use unencrypted private keys.
- Use
ed25519keys instead ofRSAif available. - Use
-owithssh-keygen. On older versions of ssh-keygen, this provides much better resistance to brute force. - Do not use agent-forwarding, instead use
-Jon the command line orProxyJumpin your config file if available. - Only use X11-forwarding when necessary.
If something does not work, you can open a ticket by writing the the support email address linux-service @ gsi.de. For problems with SSH, please include the debugging output of your SSH command, by using the option -vvv.
Support
- Support email: linux-service @ gsi.de